单页面应用程序
单页面应用程序简称SPA(Single Page Application),是指一个Web网站仅有唯一的一个html页面,所有功能与交互都在这个唯一的页面中完成;
Vue-cli
vue-cli是Vue.js开发的标准工具,简化开发者基于webpack创建工程化Vue项目的过程,让程序员可以专注于编写应用代码;
vue-cli是npm上的一个全局包,通过npm install -g @vue/cli命令进行安装;
# 查看vue版本
vue -V

# 创建vue项目
## projectname为项目名称,项目创建完成后,会自动在basepath目录下创建一个projectname子目录
cd basepath
vue create projecname
Vue项目结构
node_modules:依赖包目录src:源码目录assets:存放项目中用到的静态资源,如css、图片等;components:存放项目中自定义的组件;main.js:项目入口,项目运行时先执行该文件;app.vue:项目根组件;
index.html:应用首页package.json:项目依赖包信息
Vue项目运行流程
在工程化的Vue项目中,Vue通过main.js将App.vue渲染到index.html的指定区域中;
//导入Vue组件
import Vue from 'vue'

//导入App组件
import App from './App'

//导入router组件
import router from './router'

Vue.config.productionTip = false

/* eslint-disable no-new */
new Vue({
  el: '#app',
  router,
  components: { App },
  template: '<App/>'
})
组件化开发
组件化开发指的是根据封装的思想,将页面上可重用的UI结构封装为组件,提升项目的健壮性与可维护性;
vue项目中以.vue为后缀名的文件即为一个组件;
组件结构
每个vue组件都由三部分组成:template、script和style:
template:组件的模板结构;script:组件的JS行为;style:组件的样式;
组件
data无法指向对象,可通过函数返回值的方式来定义数据,其他类型与js中定义一致;组件
template中只能有一个根节点,需要定义多个div时,可在外层再进行包裹;
组件使用
组件的使用分为三个步骤:
通过
import导入组件;在
components节点中注册;以标签方式进行引用;
功能性组件可配置为全局组件:
// vi main.js import Count from './components/Count.vue' Vue.component('UdfCount', Count)props:自定义属性,支持不同组件内引用时赋予个性化的初始值;且其定义的初始值建议为只读属性,应避免修改其值,如需修改则将其值转存至data中;<script> export default { props: { init { //指定默认值 default: 0, //指定传入值类型 type: Number //指定该值为比选项 required: true } }, data () { return { count: this.init } } } </script>样式(style)
样式默认为全局样式,多个组件可能会出现样式冲突,可通过
scoped和deep来规避冲突// scoped表示当前组件生效 // deep表示穿透覆盖子组件 <style lang="less" scoped> /deep/ h5 { color: yellow; } </style>
组件生命周期
组件生命周期分为:
- 创建阶段:
beforeCreate(创建前)–>created(创建) –>beforeMount(渲染前) –>mounted(渲染后) - 运行阶段:
beforeUpdate(更新前) –>updated(跟新后) - 销毁阶段:
beforeDestroy(销毁前)–>destroyed(销毁后)
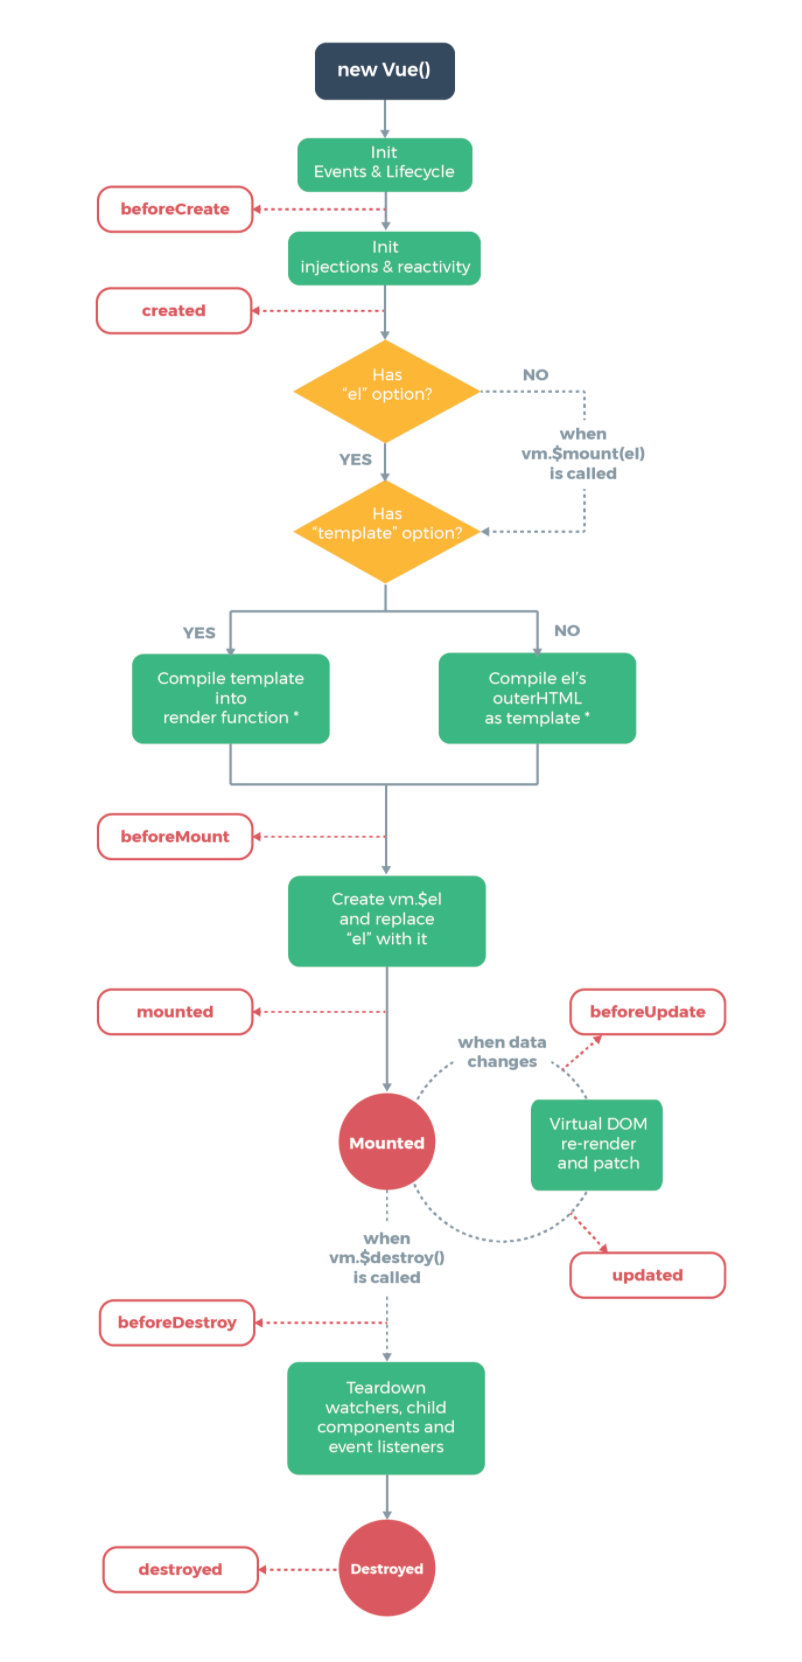
init(Events & LifeCycle):初始化时间和生命周期函数,此时props、data、methods均为创建,处于不可用状态;beforeCreate:此时基本无法进行有效操作;init(injections & reactivity):初始化props、data、methods- **
created**:常用于调用ajax请求,并将请求到的数据转存至data中;但此时组件的UI模板尚未生成; beforeMount:此阶段几乎不会用到;Create vm.$el:用内存中html结构替换el属性指定的DOM元素;- **
mounted**:完成HTML渲染,浏览器完成获取DOM结构; beforeUpdate:此时数据已更新,但DOM尚未更新;[^1]Virtual DOM re-render:更新DOM;- **
updated**:根据数据完成了DOM更新; beforeDestroy:此时组件尚未销毁,组件仍在正常工作;Teardown:销毁data、props、methods等;destroyed:完成组件销毁;
组件数据共享
父组件通过自定义属性向子组件共享数据;
子组件通过自定义事件向父组件共享数据;
兄弟组件通过
EventBus(vue 2.x)实现数据共享;- 创建
eventBus.js模块,并向外共享一个Vue实例; - 数据发送方:调用
bus.$emit('事件名',发送数据)方法触发自定义事件; - 数据接收方:调用
bus.$on('事件名',事件处理函数)方法注册一个自定义时间;
基础类型为传递值,复杂对象传递对象引用;
- 创建
自定义组件
通过<component>标签可以用于在HTML中进行占位,通过:is='xxx'来绑定要渲染的组件名称即可实现动态渲染组件
插槽
通过<slot>可用于组件中预留不确定区域,在实际使用时根据传入元素进行渲染;
- 默认插槽名称为
default,在实际渲染时,可直接在组件内容区域填写元素即可; - 使用组件时,可通过
v-slot:xxx来指定元素将要渲染的插槽位置,但v-sloth不能直接作用与元素,需通过template来进行包裹,其中v-slot:可简写为#; - 插槽定义时,可以指定默认值,当渲染组件未传入元素时,将使用默认内容填充插槽区域;
<Left>
  <template v-slot:demo>
    <p>this is Left content area</p>
  </template>
</Left>

<template>
<div class="left-con">
  <h3>Left Component {{ count }}</h3>
  <slot name="demo">
    <h2>this is default content</h2>
  </slot>
</div>
</template>
具名插槽
声明插槽时指定插槽名称,即为具名插槽,未指定名称即为默认插槽;
<slot name="header"></slot>作用于插槽
声明插槽的同时为插槽定义数据,则为作用于插槽;
<slot name="content" msg="hello vue.js"></slot>自定义指令
通过directives节点来进行自定义指令声明;
//私有自定义指令
directives: {
    color: {
      bind (el, binding) {
        el.style.color = binding.value
        console.log('trigger bind func')
      },
      update (el, binding) {
        el.style.color = binding.value
        console.log('trigger update func')
      }
    },

    //简写(bind与update逻辑一致方可简写)
    color1 (el, binding) {
      el.style.color = binding.value
    }
  }

//全局自定义指令
Vue.directive('color', function (el, binding) {
  el.style.color = binding.value
})
路由
嵌套路由
默认子路由与重定向
动态路由
路径参数与查询参数
导航
声明式导航:点击链接跳转方式实现;
编程式导航:调用api方式实现;
push:跳转至指定hash地址,并增加一条历史记录;replace:跳转至指定hash地址,并替换当前历史记录;go:按照访问立即记录进行指定步长跳转;back:后退一层,相当于go(-1)forward:前进一层,相当于go(1)
导航守卫
- 全局前置守卫
用于控制路由的访问权限;
回调函数的三种调用方式:
next():具备权限,直接跳转过去;next('/login'):不具备权限,跳转至登陆页面;next(false):不具备权限,停留在当前页面;
ESLint
ESLint是一种可组装的JavaScript及JSX代码检查工具;
.eslintrc.js为其配置文件:
// https://eslint.org/docs/user-guide/configuring

module.exports = {
  root: true,
  parserOptions: {
    parser: 'babel-eslint'
  },
  env: {
    browser: true,
  },
  extends: [
    'plugin:vue/essential',
    // https://github.com/standard/standard/blob/master/docs/RULES-en.md
    'standard'
  ],
  // required to lint *.vue files
  plugins: [
    'vue'
  ],
  // add your custom rules here
  rules: {
    // allow async-await
    'generator-star-spacing': 'off',
    // allow debugger during development
    'no-debugger': process.env.NODE_ENV === 'production' ? 'error' : 'off'
  }
}
- 定义全局相关功能放到
main.js文件中;- 在导入组件时,如果指定导入的为一个文件夹,则默认导入该文件夹下
index.js文件;
FAQ
Q:
TypeError: this.getOptions is not a functionA: 该报错一般为
less-loader版本过高导致;Q:
TypeError: loaderContext.getResolve is not a functionA: 该报错一般为
less与less-loader版本不匹配导致;vue2.x推荐less@2.9.0+less-loader@5.0.0
 `ReferenceError: BASE_URL is not defined`
 修改`public/index.html`文件中`<link rel="icon" href="<%= BASE_URL %>favicon.ico">`代码为
 `<link rel="icon" href="<%= htmlWebpackPlugin.options.url %>favicon.ico">`
减少打包文件大小:
取消部分模块打包,在public/index.html中使用cdn资源
configureWebpack: config => {
if (process.env.NODE_ENV === “production”) {
config.externals = { // 不会被打包的库
‘vue’: ‘Vue’,
‘vue-router’: ‘VueRouter’,
‘moment’: ‘moment’
}
}
}